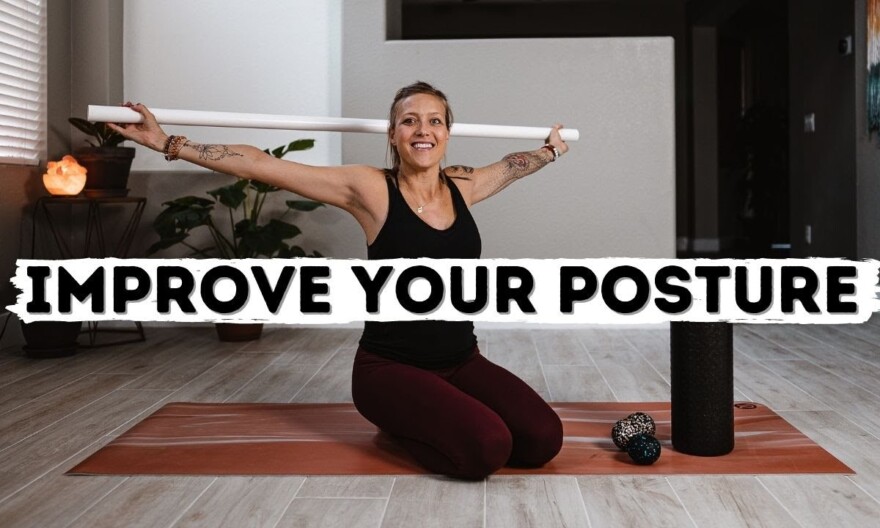
Bre is guiding you through an all levels myofascial release (MFR) self massage rollout targeting the superficial front line to lift the connective tissue in the front side of the body. In today’s class, you’ll be breaking up the adhesions in your fascia tissue in your body with some movements and MFR using various props. Restrictions in the Superficial Front Line close the front of our body and emotions. By opening it we can come into a better vertical alignment and open ourselves to life. Fascia is literally everywhere in your body, it’s an interconnected web of tissue surrounding and within muscle, around organs and it’s making up your entire body. This means if you were to remove the bones and muscle and only leave fascia tissue, you would still see a perfect image of the human body. These very simple self-massage techniques remove tension and tightness in the body. We hope these exercises help relieve pain and discomfort as well as helping you move better. If things get intense, as always, breathe through them.
Recommended MFR ball set: Fascia release balls:
Join the wolfpack:
Online Shop:
Subscribe to Newsletter:
Instagram:
FULL PROGRAMS
*****
Yoga every damn day – 30 days of yoga calendars:
Yoga for BJJ program:
Aware – 30 day mindfulness program:
JOIN OUR WOLFPACK
*****
Join the discussion on Discord:
Retreats:
Teacher trainings:
Travel destinations:
Music for yoga:
Find a structural integration therapist:
The harmonic 13 months 28 days calendar:
Inquiries:
PRODUCTS
*****
Merchandise:
Medicinal mushrooms:
The best E-Bikes:
Yoga mat:
RECOMMENDED VIDEOS
*****
Full body joint mobility routine (CARs):
Vinyasa sequence breakdown:
Wrist health:
Plank pose:
Chaturanga pose:
Upward facing dog:
Downward facing dog:
Fix back pain:
Crow and crane pose:
Handstand tutorial:
Pulling:
What we eat in a day:
Yoga and pregnancy:
CHAPTERS
*****
00:00 Intro
01:00 Practice
MUSIC
*****
Weir – Tomas Skyldeberg
We get our music from Epidemic Sound:
Love and Gratitude,
Bre & Flo
*****
Breathe and Flow is a travel, yoga and lifestyle channel owned by Bre and Flo Niedhammer. Knowing that the body benefits from movement while the mind benefits from stillness, we share our philosophy of mental stillness through the fluidity of a strong practice. Bre and Flo are Registered Yoga Teachers (RYT) with Yoga Alliance® holding the highest certifications as E-RYT500, and are also Yoga Alliance Continuing Education Providers (YACEP). They are trained in vinyasa yoga, hatha yoga, yin yoga, myofascial release therapy, reiki, prenatal yoga and are certified in Functional Movement Screen (FMS) Level 1 and 2, Animal Flow as well as certified Functional Range Conditioning (FRC) Mobility Specialists. Bre and Flo have taught at several premium yoga studios for many years and are teaching their teacher trainings, retreats, workshops and at festivals around the world. They curently live in Las Vegas, Nevada. Learn more about them and their certifications on their website:
DISCLAIMER
All content on our channel is subject to copyright or other intellectual property ownership by Breathe and Flow LLC. The ideas, classes, tutorials, exercises, workouts and other opinions expressed here reflect our experiences and opinions and are not intended to be, or to replace, medical advice. We do not hold ourselves out to be dietitians, nutritionists or medical professionals. Please consult your doctor before starting any diet or exercise program. By using our site, and by watching our content, you understand and agree that neither Breathe and Flow nor any persons associated with it have any liability to you for any injury or loss you may suffer in connection with any content we may post.
Some of the links used above are affiliate links through which Breathe and Flow earns a commission when products are bought using these links.
#breatheandflow #yoga #yogawithbnf
[Music] Welcome to this movement and myofascial Release practice where we're going to be Working on opening the front side of the Body more specifically The Superficial Front line oftentimes our day-to-day Practices lead us to shrinking the front Of our body and lengthening the back so The front side of the body starts to Move down the back side of the body Starts to move up and we create this Sort of closing space in our body so Today we're going to use a few different Props some different movements and Stretches and exercises in order to open And lift the front side of the body Those day-to-day activities could be Writing on our phone typing on the Computer eating food driving in the car All of these movements are forward Rounding and causing this space to close Down and Shrink The Superficial front Line runs from two parts from the tops Of your toes all the way up to your Pelvis and then the pelvis at the base Of your abs up through the sternum the Collar bones and the sides of the head So we're going to begin at the tops of The feet and then move up throughout the Entire body I recommend that you Practice this class once or twice a week So you can continue to counter balance All of the rounding and shrinking motion That we have on the front side of the
Body so this class can be integrated Into your regular daily exercise Movement but it can also be done as a Standalone practice or at the end of Your other movement practice You'll need a few different props for Class today first thing is a single Myofascial release ball or therapy ball Second thing is a double myofascial Release ball which I will call a peanut Third thing is a foam roller fourth Thing is either a yoga strap a belt a Wood dowel or a PVC pipe so I have a PVC Pipe with me and we'll be using this for Some shoulder opening Mobility work at The very end So if you don't have all of these props I recommend that you check in the Description below we do link to the ones That we have here and once you get these Props then you're ready to go as I Mentioned we're going to be working from The tops of the toes all the way up Through the front of the body to the Neck or collarbone so let's begin at the Feet so we're going to start in Thunderbolt pose Just going to sit on the heels Legs are together if this already feels Like it's too much on the ankles then You can also place a pillow underneath The ankles We're going to be here for about two Minutes so this is to stretch out the
Front side the dorsal side of our feet Our toes and already begin to lengthen The fascia in the bottom half of the Body Now for this second minute you can Either stay here as you are or if you Would like to increase the stretch on The tops of the feet then you can bring Your fingertips down onto the ground and Start to lift the knees up towards the Chest Start to put your awareness on the Breath In any form of Movement practice regardless of whether We can classify it as yoga or not It's still very important to be mindful Of the breath to be aware of how your Body is moving in space And how you can use the breath as your Guide To bring your body into these different Shapes So keep that connection to the breath 10 more seconds here And release you're going to grab your Peanut and we're going to start to move Up the body so starting at The Shins Come into a tabletop bring this peanut Underneath your right Shin And start to add some weight Onto this Muscle Therapy peanut double Ball
And then begin to roll Very slowly Up and down And this time when the ball gets a Little bit closer to the knee Then you're going to sort of lift up the Back heel to give yourself some space And then just start to Flex and point the right foot And at the same time you're still adding Pressure on the peanut ball so you're Sort of pinning the tissue on the ball And then you're flossing the fascia Around the muscle All right and release Place the peanut underneath the left Shin And same thing you're going to roll that Down Towards the ankle Back up Towards the knee One more time down And back up So now the peanut is just a few inches Below the knee start to lift the left Heel up And then point and flex the left foot And release Come back to that table top tuck the Toes under and then lift the hips Downward dog We're not here for too long we're going To start with a little bit more movement
So begin to shift the hips forward make Your way into an upward dog come on to The tops of the feet you can keep the Feet a little bit wider Engage The Glutes and now stay on the tops of the Feet Engage The Core lift the hips Downward dog stay on the tops of the Feet Again Lower the hips upward dog we're Going to do nine more lift the hips down Dog tops of the feet the entire time You're not switching the feet lower the Hips upward dog Engage The glutes lift The hips down dog tops the feet Let's go for six Five Four Hmm Three Two Last one And then return to upward dog We're gonna stay here for about 10 Seconds So really push the ground away lift with The chest and the Gaze is straight ahead So instead of looking up towards the sky You want to look straight ahead and then You can even pull the chin back just a Couple inches or an inch or centimeter And that will also stretch and lengthen The Superficial front line And set the knees down Lower all the way onto the belly
Now we're going to do half frog on the Right side first So you can either keep your chest lifted Or you can lower it down but you're Going to bend your right leg And grab on to your right foot with your Right hand So maybe for you this is already enough Maybe you can't even reach this and if That's the case you can grab your yoga Strap throw it around your foot and then Gently pull the leg in But if you can reach the foot then you Can either just hold on to the top of The foot Otherwise if you can lift the chest Then you can also start to bring The fingertips going the same direction As the toes And you can Really get a good stretch On the right quad So no matter what variation you took or How far you can stretch Doesn't matter You're just looking for the sensation in The stretch in the right quad So take whatever Variation you need to feel best in your Body Last five Four Three Two
And one gently release And switch over to the left leg Again take whatever variation Feels good in your body Last five Four Three Two and one gently release the left leg Now you're gonna take your foam roller And we're gonna do a Roll out on our right quad first so you Can grab the foam roller roll on to the Left side so you can lift your right leg Up And then you can place the foam roller So that there's so it's not across the Entire length of the mat but it's about Halfway so it's only on the right side Of your mat Foreign So you can start up closer to the hip And then slowly begin to roll forward You can kickstand your left leg out To help assist as you roll forward and Back For this you can roll all the way down To just a couple inches above the knee And then again bring it all the way back Up towards the hip Let's do one more full length so from The hip Start to bring your body forward Try to relax the muscle tissues on the Right quad and allow the muscles to sort
Of melt over the foam roller Back to the knee and then again Bring that foam roller up To the hip And release Bring the foam roller over to the left Side Start at the left hip You can prop kickstand that right leg Out And again start to roll on the foam Roller Moving very slowly So it Gives a little bit of time for the Fascia to Move over the foam roller The muscle tissue So if you're rolling super fast and sort Of aggressively Then you're not doing As much for yourself in the long run It might feel good short term But it's better to move Slowly All right one more time the foam roller Is at the hip So to roll it down Try to relax the left quad Try to soften the breath And now you're at the knee and again Reverse Bring the foam roller back up All the way to the hip
And release Now you're going to come down onto your Belly Cactus both of your arms out to your Sides So the biceps triceps are Sort of parallel with the top of your Mat And then keep the feet a little bit Wider Engage The glutes and start to Lift the chest off Half Locust lifts and lower down lift it Up And lower Eight Seven Really squeeze the shoulder blades Together on the back six Five feel the front of your chest Opening four Three Two Last one we're gonna hold Hold the lift and then interlace the Hands behind the back Keep the lift in the chest Eight seven six five four three Two and one release Grab onto this single ball And then we're gonna do a mild fascial Release going up the sternum so for this I would like you to start the ball If you can first feel on your sternum Where the base of your sternum is so
Where the rib cage sort of comes Together and then you have the base of Your sternum so this little point right Here this spot where everything connects At the bottom is called your xiphoid Process and that we for sure want to Avoid with myofascial release so you Never want to do myofascial release on That spot so we're going to start a Couple inches higher than that It will be between your PEC muscles Women between your breasts so the ball Is going to begin in the middle So don't go too low on this So what we're going to do is you're Going to take the ball put it right in The middle And then start to lower the chest down Just enough to where you can feel the Pressure of the ball you're pinning it There And now that the ball is in place As you start to lower the chest down Very slowly The chin comes all the way down to the Mat You can very subtly feel the tissue in The sternum moving upwards So you're sort of pinning the tissue With the ball And you're moving that tissue upwards And then again lift the chest up Sometimes the ball will naturally start To move up on its own if it doesn't then
You can just take the ball move it up Just about one centimeter Pin it there and then again start to Lower the chest down very slowly It's popping in a feel pretty tight Maybe a unique and different sensation Than you felt before So just move slowly Avoid any sensations of pain And again lift the head up Maybe adjust the ball bring it one more Centimeter up And again start to lower the head down And lift The tissue up towards the chin And again lift the head Last one move the ball up just a Centimeter So this last one is going to end right At the right at your collarbone So you have the ball pinned and then Slowly start to lower your head down Great And release you can remove the ball off To the side and come into Sphinx pose So forearms are parallel elbows are Underneath the shoulders Broaden the collarbone see if you can Open this space up just a little bit More And then again gaze straight ahead So when you're tipping your head up In an upward dog or in Sphinx What you're actually doing is you're
Shrinking your superficial front line With your Sternocleidomastoid muscle which runs From Your side of your skull all the way down To your collarbone So by tilting your head up you're Actually shrinking that space so it's Actually better to gaze straight ahead And then just gently pull the chin back It's a super subtle movement But over time it will really benefit Lengthening the front side of the body More than tipping your head up towards The sky Last five four three Two One and release the chest comes all the Way down to the ground Then you're going to extend your right Arm out to your side You could either keep your right arm Straight Or if you want to increase the stretch In the front side of your right shoulder And your pec muscle more then you can Bend your right arm at a 90 degree so For me I like to keep the arms straight This is enough of a stretch for me But for you you can decide right arm Straight or right arm bent let's all Start with it straight if you've never Done this before we're doing a Wrestler's twist
So chest down to the ground bend the Left leg and start to bring the left leg Behind the body up and over And the sole of the left foot Comes down to the ground And then you have the option here to Also bring your left hand behind you Somewhere around your low back And again focus on Creating space In the collarbone in the pecs in the Chest And release And over to the left side Extend your left arm out Start to bend your right leg bring it up And over behind you And the option to bring your right arm Your right hand the back of your right Hand to your low back Or all the way to the ground We're here for about five breaths Try to relax the muscles in your face And slow down the breath Release Come back onto the belly And then one more time in Sphinx Not here for too long about 20 seconds So you can either stay here in Sphinx Neutralize the spine in a symmetrical Pose Or if you want to deepen the back bend And open the front side even more Then you can Flex the glutes keep the
Hands where they're at and start to Straighten the arms for seal pose If you're here and you found it too Intense you can also lower back down to Sphinx Last five four Three two and one release Bring the head all the way down to the Mat Shake out the hips first Release the tension in your low back And then come back to a seated Thunderbolt position Just as we did at the beginning of class You're going to grab your Yoga strap or the belt or your wood Dowel Or PVC pipe whatever you have So with this you're going to grab The bar or the pole Um pretty wide To start and then as we go you can bring Your hands closer together so the Farther your your hands are apart the Easier this is going to be on your Shoulders and your chest and then the Closer the hands are together the more Challenging and the deeper the stretch Will be so I recommend starting Pretty wide and then we can shrink it Down afterwards so we'll do five of These so hold on to the dowel the strap The belt whatever you have and then keep The arms straight and start to bring
This up and over your head And right about here you discover that It's either too deep or it's not deep Enough so you can adjust The hands wherever you need to And then again complete this one All the way back And then bring The PVC pipe up and over the head all The way to the front so now you know the Distance where your arms need to be you Can make your adjustment let's do four More Lift up and over move nice and slow big Breath Feel the opening in the chest the front Side of the body And then bring that pole back Last three Last two Last one And that's it You can set the pull off to the side Thanks so much for joining me today I Hope that you feel more open and ready In your body to move and feel good if You enjoyed this video then please like And subscribe send this video to a Friend in need and we will see you again On the channel very soon lots of love And endless gratitude